|
What is Plastination?
Plastination is a preservation method to generate non-toxic anatomical specimens, which can be used for long-term educational purposes. The basic idea of plastination is that a plastic polymer replaces the biological fluid within a given specimen. Dr. Gunther von Hagens first invented this method in the 1970s1. Subsequently, Dr. von Hagens developed the Body Worlds exhibit, which has been displayed in museums around the world. Our lab utilizes plastination to preserve hearts from our library for specific cardiac educational purposes.
There are several different plastination methods that are currently used. Our lab employs Room-Temperature Silicone Plastination using North Carolina Products and Techniques2, which are described below. All plastination methods involve four stages:
- Specimen Preparation
- Dehydration and Defatting
- Force Impregnation
- Curing
A. Specimen Preparation
The hearts are perfusion fixed in their end-diastolic state before plastination. However, the formalin must be thoroughly washed out of the heart before plastination is initiated. Hearts are typically rinsed with tap water for 2-4 days before beginning dehydration. If desired, the coronary arteries and cardiac veins can be injected with latex at this point in the procedure to emphasize these anatomies. The coronary arteries are typically injected with red latex and the cardiac veins with blue. The vessels are injected using a venogram balloon catheter.
B. Dehydration and Defatting
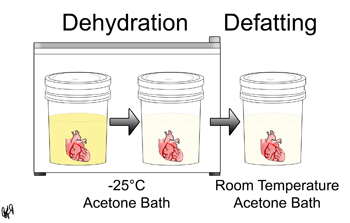
In this step, the biological fluid within the specimen is replaced by acetone through prolonged exposure and diffusion. Dehydration takes place at -25°C and defatting takes place at room temperature.
More specifically, once a specimen has been prepared as described above, the specimen is placed in a -25°C 90-100% acetone bath. A flammable storage freezer must be used for this step. Once the bath has reached equilibrium, the specimen is moved to -25°C 99-100% acetone bath. These 99-100% baths are repeated until the acetone purity is above 95% at equilibrium. Then the specimen is now ready for defatting. The majority of the fat is removed in this step because fat does not plastinate well. The specimen is placed in a 99-100% acetone bath at room temperature. These baths are repeated until the acetone purity is above 98% at equilibrium, the acetone color is clear, and the specimen fat is negligible.
C. Forced Impregnation of Silicone
The next step is forced impregnation, where a silicone polymer replaces the acetone within the tissue.
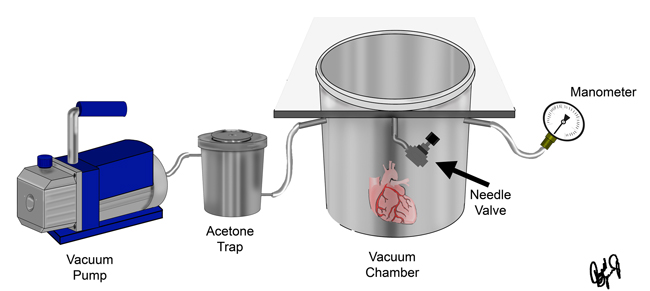
A given specimen embedded with acetone is placed in a vacuum chamber filled with a 10:1 mixture of NCS10 Silicone polymer and its NCr20 crosslinker (North Carolina Products). Since the acetone has a higher vapor pressure than the polymer mixture, the acetone will evaporate when vacuum is applied while the polymer mixture will not. Therefore, the polymer will then get sucked into the vacancies left by the evaporated acetone within the specimen.
The vacuum chamber system that we use for this process is illustrated in the figure below. After the specimen has equilibrated with the polymer mixture overnight, the chamber is sealed and the vacuum is applied. The vacuum pressure is controlled with a needle valve connected to the chamber. The pressure is gradually lowered by closing the needle valve to maintain rapid bubble formation within the chamber. The dry ice acetone trap is used to condensate and trap the acetone before it reaches the vacuum pump. It is considered that all of the acetone has been removed from the specimen when bubble formation has ceased, the needle valves are closed, and the vacuum pressure is less than 5mmHg. Once impregnation is complete, the pump is turned off and the specimens return to atmospheric pressure.
D. Curing
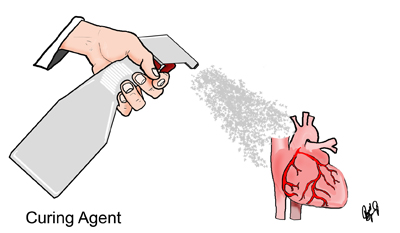
In this step, a curing agent is applied to the specimen. The curing agent catalyzes reactions between the polymer and its cross-linker, which allows the specimen to harden.
The specimens are removed from the vacuum chamber. They are drained and wiped down to remove any excess polymer. The specimens are left to dry for a few days to allow for some chain extension of the polymer. The NCt30 catalyst (North Carolina Product) is then applied to the specimen with a spray bottle or paintbrush. The specimen is then wrapped in plastic wrap. The catalyst application and subsequent wrapping are repeated daily until the specimen is fully cured.
[1] U.S. Patent 4,205,059 Animal and vegetal tissues permanently preserved by synthetic resin impregnation, filed November 1977, issued May 1980
[2] Henry RW. Silicone Plastination of Biological Tissue: Room-Temperature Technique, North Carolina Technique and Products. Journal of the International Society for Plastination 2007; 22:26-30.
|